Monday, 31 August 2015

Creating the Perfect Planner ......... Organise Your Life the Fun Way!

Planners are the the new craze coming over from America and it is pretty much a cross between scrapbooking and a filofax! Sounds perfect hey?!? Well I think so ... I have loved pretty stationery ever since I was a little girl always wanting funky pens, rubbers, notebooks etc and to be quite honest with you not much has changed! LOL

With my life now changing slightly I am going to have to juggle a part time job in marketing with my business 'Sarah's Simply Handmade' and that means being organised as we are about to go in to 'silly season' for us crafters leading up to Christmas so I have been looking at these planners for ages and I think I have found the perfect one for me! And here it is ......
Complete gorgeousness - right?? I found this amazing page on Facebook by 'Hearts by Emma' and pretty much landed in stationery heaven! So having spent an absurd amount of time on her Etsy page https://www.etsy.com/uk/shop/Heartsbyemma this beautiful little parcel of loveliness arrived in the post and today I have spent a wonderful couple of hours getting it ready to use!
If you are thinking about getting one here's what I have done to personalise mine and give it a little bit of Tilda magic too! Let's face it if I didn't add Tilda to my planner I don't think anyone would believe it was mine!

First up - gather all your goodies together, all the pretties and stickers you can think of, some Tilda papers, labels and embellishments, plus any extras - I needed contact sheets, to do lists and extra note paper in pretty pastel shades of course & some essential tools to help make it all happen! 
Start by organising your layout .... how you will use your diary/planner/organiser and don't forget to always add the 'smile' factor wherever you can! Most planners will come with a set of 'pretties' so it's up to you how you use them and embellish them. I wanted to smile every time I opened my planner so I cut to size the 'hello' velum that came with the planner and changed the original backing to one of my favourite Tilda designs ...
I then started putting in all the 'dashboards' (dividers) for all the categories I wanted in my planner beginning with the calender section. I want to feel inspired and motivated when I open my diary so I chose one of the velums that came with the planner, some Tilda paper cut to size, one of the pretty glitter crowns paper clips I also bought from 'Hearts by Emma'.
Next up the to do lists! There's bound to be plenty of those!! - the planner already has a main divider for this entitled 'Lists to Love' and some gorgeous papers for daily to do's etc but I needed an extra section to divide my two lives ...  Again I chose Tilda papers, one of the 'To Do' Stickers and a perfect quote card from my 'Hearts by Emma' bundle and because the Tilda papers are double sided I have 'fancied' up the back by adding a Winter Memories angel and some cute stickers I already had.

I'm sure I am going to need to write down lot of notes and ideas, the planner comes with a section called 'Write it Down', there's also another with beautiful papers for 'Memory Keeping'. Among these I have added an extra notes section. Using Tilda  papers, a delightful glittered pink crown paper clip (can paper clips be delghtful!??! ..... probably!) and another quote card saying 'Here's the Story' ..
Everyone needs good contacts in business and in life! Whether it be friends, family, business contacts, stockists, suppliers - you name it we need them all in our lives ..... but only good ones! which is why I have purposely added the perfect quote card at the beginning of my contacts dashboard that says 'Don't let anyone ever dull your sparkle' that way I won't let any dull people make it in to my contacts section! I also included a pretty rose paper clip, more Tilda papers and on the reverse one of the Tilda angel dolls with a 'truly happy' post it - all our contacts should make us truly happy - right? 

With all the main sections now having their own personalised features I was able to work my way through the planner adding some more fun bits. Most planners will come with a new month section for your diaries - the ones in my planner were already gold foiled with the month but then just a plain white sheet which obviously just isn't good enough for us crafty planner types so I have added a little bit of Tilda paper craft embellishment on to each one to liven them up and get me in the mood for the month ahead!

For emergencies I have a spare paper clip, a Tilda paper dashboard card, a birdcage post it note and notepaper all adding to the general prettiness! 


And the big question .... did it actually close when I had added all my bits ??? ............ of course it did! LOL with it's beautiful pale pink leather tassle winking out of the bottom and the wonderful little tag that says 'Be Yourself' and my pretty sparkly pen neatly placed in the pen holder! 
And that is it! All I need to do now is 'add my life' whether that will be quite as perfect as my beautiful planner is another thing ..... but you know what? ...... it's a new start & new beginning for me that starts on September 1st and I'm going to give it a good go! ............ if you want to create your own perfect planner here's a few links that you might find useful ...... Good luck, Happy Planning & Enjoy!

Sarah X

                                           https://www.etsy.com/uk/shop/Heartsbyemma


The Happy Planner: http://www.thehomemakery.co.uk/stationery/mambi-happy-planner
                                                      http://www.meandmybigideas.com/create365-thehappyplanner/


Monday, 17 August 2015

Get Creative with an Inspiring Quote or Two!

I've always been a fan of inspirational signs and have a few scattered around my home one of my fave's is this one merrily hanging from my lovely shabby chic sideboard ......'The time you enjoy wasting is not wasted time' which is exactly how I can justify my little coffee break sat here sharing my favourite little quotes with you!


Of course this being a crafty blog & me being a big fan of sewing I have a few classics I love to use and share these on my social network pages from time to time. I think I do actually feel that 'My Soul is Fed with Needle & Thread' ~ sometimes I really do think I have a sewing addiction .......hey ho! 

and of course you can't actually be a sewing addict without having a bit of a fabric problem! For any of you that feel like it's your birthday or Christmas every time you 'have' to buy more fabric (or even look at it/ stroke it ..... feel free to add your own!!) or come across a print in just the perfect design, colour palette and texture this one's especially for you ... I am definitely guilty as charged !!


Also on my quest for the perfect crafty quotes I found these super cute vintage ones ..... I hope people know that when us crafters make something for someone we don't just put it together we do wish & wish that they are going to love it and know how much love has gone in to making it for them.


Clearly some of you out there don't just make for love but like me have turned your hobby into your own little business however big or small and so to us buying handmade is important otherwise we would be out of a job and just have a room full of stuff because we can't stop making things! I'm really tempted sometimes to print out this next little 'quote' and pop on my craft fair tables - I wonder if it would make customers stop and think why something costs what it does and how much of your time, effort, love & individual creativity has gone in to making each piece? Of course I don't display it for fear of driving people away but really we all should?!


Here's a few more that I use and are always are a quick fix for getting the message across:

I think that last one is particularly poignant - I wonder if people realise how much a metre of fabric actually costs? I blame the high street for buying in bulk and selling at crazy prices that stop customers realising how much these things we create actually cost! 

Since crafting I have met a lovely lady on Facebook called Annie who is the 'Queen of Quotes' and inspiration over at Birdcages and Butterflies (https://www.facebook.com/pages/Birdcages-Butterflies/296408816435?fref=ts) I love her style and she always seems to choose just the right words ...... if you're reading this and also use Facebook definitely pop over and say hello, like her page and enjoy seeing her inspirations and work come up in your newsfeed.


As crafters we all know how 'messy' the creative process can be sometimes with buttons, ribbon & goodness knows what else all strewn about in the craziness of creating just the perfect look and getting just the right 'addition' to make the perfect creation and so my next quote is always a fave and should be put out there at least once a week!

And when the family, the housework or some other lesser distraction is calling there's no other option but to shut the door and hide it all! ha ha! I'm sure we can all relate to this one! 

Ultimately though being inspired and creating things is a way of life, if the quotes have helped or made you smile that's good enough for me as after all 'Craftiness is Happiness' .............


Sarah X


Monday, 3 August 2015

Creating my Dream Craft Room - The Mood Board

In the next month I am about to move out of my current location and move everything back home and I'm super excited about re-creating my craft room at home. I genuinely believe you have to be surrounded by prettiness in order to create it! Inspiring surroundings feed the imagination and help you in your creative process of making beautiful things.

I am going to go with a pastel colour scheme with a touch of rustic - that's if I can resist getting out the paints!! This is a great palette for me I'm not a big fan of bright colours I find the pastels calming and they allow me to think & breathe when I'm surrounded by them!


Lovely pastel pinks, blues, teals, greys are just perfect!

It's not all about the colour palette though it has to be practical too. My craft room at home is tiny really - a spare single bedroom so I am going to have to be economic with my space and look for the best storage solutions so that it doesn't look like a cluttered mess!! More importantly that the messy bits can be hidden away and the pretty bits are what are on show. 


I already have some gorgeous Tilda Tins, a couple of their ribbon holders and other Tilda storage pieces so I'll definitely be including them. The colours work perfectly for what I want and I will be able to hide things away perfectly. I'll need to address some issues though - like how to have SO MANY ribbons at hand without looking a disgraceful tangle of satin - I love the idea from Torie Jayne  (love her book 'Craft Show & Sell' by the way you have to read it if you attend craft fairs and sell your items : http://www.amazon.co.uk/Craft-Show-Sell-Torie-Jayne/dp/1782210423/ref=sr_1_1?s=books&ie=UTF8&qid=1438613304&sr=1-1&keywords=craft+show+and+sell) of using dolly pegs and think that could work for me then I can keep them all in a nice pretty basket and be able to see them at first glance.


As I have a small craft room space I need to look at the walls and how I can use them effectively I'm not sure I'll get as close as this but I definitely love the look ..........


What I do have available though are a pair of these gorgeous rustic heart shelves which I am thinking could look great filled with all my button tubs above my sewing table -  they will be at hand and will look pretty too.


To complete the rustic addition to the room I have some wicker baskets, hampers and trunks that I hope I will have room to squeeze in somewhere! 


This should cover all the essentials, I will need to source some pretty containers for everyday objects - let's face it you can't go to all this trouble trying to create a dream craft room and then just plonk your pens & scissors in just any old containers now can you?!?! 


One thing's for sure my gorgeous Tilda Sewing Box will be on my sewing table!


So there you have it this is the mood board that I will use to keep me focused and create a beautiful place to work as I move everything back home. If you are about to create or even re-create your craft room space I would recommend getting yourself all over the internet and creating your own mood board before you start. We'll see how close I get to this when I assemble the real thing & of course it wouldn't be a proper craft room without some pretty bunting so I'll just need to whip some of that up in my chosen colour palette - pretty pastels! 

Sarah X


Sunday, 2 August 2015

The Tilda Apple Bloom Quilt - Stage 2 - Sewing Log Cabin Blocks!

So after all the preparation carried out in stage 1 it's finally time to get out the sewing machine! yay! Again this stage also needs to be quite methodical I'm finding as again when it comes to the next stages further down the line I'm pretty certain I'll be rewarded for careful and as precise sewing as I am able to do now. 
One step at a time - BLOCK 1 - First I've taken 1 piece of each strip for the log cabin from my carefully pre- labelled sections (I am  now feeling quite smug that I'm a virgo and therefore my prep & organisation is coming in to its own!). Next following the guide from the pattern starting with pieces A & B I have sewn these together making sure the fabrics are the right way up to follow the fabric designs. Making sure I open the seams at the back each time I sew another piece of fabric in to place I have continued alphabetically (see pic) adding sections C & D.


Each time as the Log Cabin BLOCK gets bigger I have opened the seams at the back to make sure when they are pressed and ironed at the end they will sit perfectly flat ready for quilting later. 


Although the Log Cabin design looks fiddly and a little complicated to look at, I've found it's actually a fairly straight forward pattern to follow as long as you line each piece up as you go along and make sure the seams are open at the back when adding the next piece. I was constantly checking back with the pattern and making sure the fabrics were all facing the right direction etc. Once all the pieces are sewn together it's time to get the iron out (that's if you're naughty like me and not been doing them as you go along!). I started by ironing the back opening all the seams and ironing them completely flat before turning the complete BLOCK over to iron the front ... and here it is my first LOG CABIN BLOCK completed. It's a great sense of achievement to know I've been able to master this having cut SO much fabric out for this quilt! 


I have to say I'm loving how all the fabrics work together but then when working with Tilda especially from one of their ranges you always know everything is going to tone in so well! Here's a quick peep at the boring bit - the back with all the seams sitting nice and flat.


So the quilt pattern I've chosen to use has 2 different BLOCKS repeated 8 times, so on to BLOCK 2 and the same process again starting from the centre.


Each BLOCK has 13 pieces so it's a bit of a repetitive process adding one piece at a time, making sure the fabric design is the right way round and ensuring the seams have all been opened at the back each time before adding another piece. The end result is worth it though! Here's BLOCK 2 completed.


In total there are 16 BLOCKS to sew to make up the quilt pattern I have chosen ... and I've now managed to make 5, three of BLOCK 1 and two of BLOCK 2. By adding the blocks in to a photo collage you can see how my quilt is starting to take shape ........ only 11 more of these to go!!

Obviously mine will be straight!! LOL these pics look all wonky it's just the angle they were taken at I promise they are nice and straight! I'll keep updating this Stage until all 16 are complete so you can see where I am up to. But so far so good, all is well in my new world of quilting and I'm still smiling .......... for now! 

~~~~~~~~~~~~~~~~~~~~~~~~~~~~~~

It's the 24th June and feeling pretty accomplished today as I have finished all the 'log cabin' Blocks for my quilt! eeek !! The quilt effectively now looks like this (obviously not joined together or quilted yet! but all blocks in place ready the the next stage!)


The next step will be getting ready for Stage 3 - the SASHING - so I think I have something like 33 off white pieces to cut out and a similar amount of the little squares to make the corners of each block! 
Will try and get some cut out at the weekend and one block done so you can see if time permits!
Hope you're enjoying progress I know things are going to start getting trickier from hereon in! 


Sarah X


Saturday, 1 August 2015

The Apple Bloom Quilt - - Stage 1 Preparations - Follow My Progress as I make my very first Quilt

Hi there, so I have finally decided to induge myself by making a full sized quilt!! eek! I have made several patchwork projects previously but mainly bags & cushions, never a quilt! So now the dress rehearsals are over and this is it! Earlier in the year when Tilda released their Spring fabric collections & the new catalogue appeared I was instantly drawn to the Apple Bloom range & the amazing quilt photo on the back of the catalogue. I have probably been looking at it every other day ever since gradually building up the courage! I'm not quite sure how this will end but this is the picture that inspired me and this is how it should end!!


I am breaking this 'little' project in to stages and so Stage 1 is PREPARATION! with all that fabric at stake there is no room for error! Thankfully the Tilda website has all the information here http://www.tildasworld.com/the-apple-bloom-quilt/ . I have printed off the instructions, then made myself a template of each size of each piece of the 'Log Cabin' pattern ready to start cutting the fabrics. If anyone wants to try this themselves I purchased 2 x Tilda Apple Bloom Fat Quarter Bundles and now having cut everything I can tell you this was the perfect amount but you will also need to buy 1/2 metre of the 'Yarn Green' fabric and a fat quarter of 'Yellow Tan Sun' as these were absent from the bundles. 


The quilt is made up from BLOCKS of LOG CABIN patterns and these repeat alternatively throughout the quilt. Little tip - I made sure that when I was cutting the fabrics I always referenced the Block pictures so I knew if it was a horizontal or vertical piece I was cutting in order to make sure the fabric patterns were always going to look their best on the quilt.


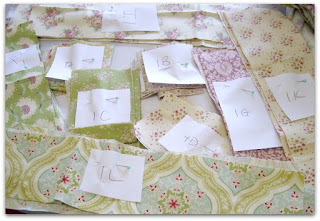
I dont have a rotary cutter which I know is a cardinal sin for any 'serious quilter' so I made sure I was cutting evenly by laying the template on to the fabric in the right direction and then allowing a 1cm seam when making the final cut.  Each time I cut a piece of fabric I have ticked it off my sheet so that I know this one is done and then labelled & pinned those together so for example: 1A is a reference to BLOCK 1 and piece A, and so on ... (see pic below)


This cutting out stage is quite lengthy as you will need eight lots of each piece and there are 13 of them on each BLOCK. Actually how many is that!??! ... infact it's 104 pieces altogether for each block so you will have 208 pieces once all the LOG CABIN Blocks are complete (note at this stage I haven't cut out the off white fabric or the corners for joining all the Log Cabins together this will come later in the project as I have decided to sew all the log cabins together first) 


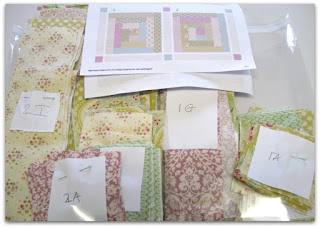
As with any project that's worth doing well preparation is the key to success as the old saying goes 'Fail to prepapre & prepare to Fail!' so you can see why I have taken my time at this initial stage of the cutting process, making sure all the fabrics are horizontal or vertical depending where they appear on the Log Cabin design, and labelling each set of pieces and placing in to two bags - one for Block 1 and another for Block 2. (see pic below) I am sure this is going to make the next stage so much easier as 'ALL' I need to do now is sew the Blocks together piece by piece until I have 8 Blocks of each Log Cabin design so 16 in total!!! 


This little lot should keep me busy for a while - next stage 2 - sewing my first 2 Blocks one of each!! I'll be posting back here once those are done with some more updates of how I'm getting on!
Wish me luck! 

Sarah X